Diggsy
Prominent Member
Good spot!This is what I was referring to, intelligent charging. Under certain conditions it will. It won’t if the HV is low or if a charger is plugged in (and not charging)View attachment 17171
Good spot!This is what I was referring to, intelligent charging. Under certain conditions it will. It won’t if the HV is low or if a charger is plugged in (and not charging)View attachment 17171
I'm pretty sure it's the cabin ambient temperature sensor.Gonna give it a go today. I’ve been putting it off for enough time now. What in the world is this?View attachment 14169
How in the devils name did you manage to get the right panel of that mirror surround back in after removing it? No matter how hard I try to get it back in, once the plastic tabs lip underneath, the main metal prongs will not line up? Did you have to remove the left side to be able to put it back on?Although it's the same panel, I didn't need to touch that part. I could easily pull down just the other side.
I managed to route the cables easily, up through the rear view mirror surround:
View attachment 14170
The right hand side of the panel pops off easily with a plastic pry tool
Then push cable up under trim at top of windscreen.
The A pillar is really easy, pull away the rubber trim and you'll easily get in behind the plastic a pillar panel
View attachment 14171
Good luck
EDIT - The Micro Piggyback Connectors, 2 pin ones for the permanent live see HERE were impossibly tight, I had to trim away some plastic on the fuse to get it to go in. The three pin one for the switched connection was fine
Not sure if this has been posted already ( sorry if it has ) but below is two VERY detailed video's of Tom installing dash cam's to both the front & rear of his MG4.How in the devils name did you manage to get the right panel of that mirror surround back in after removing it? No matter how hard I try to get it back in, once the plastic tabs lip underneath, the main metal prongs will not line up? Did you have to remove the left side to be able to put it back on?
EDIT Managed to get it back on, but only by proceeding to remove the left side, installing the right side first then reattaching left side...I cannot see any other way about it.
If anyone else is struggling the same, remove the whole panel, just be careful to not touch the heat element underneath.
Not sure if this has been posted already ( sorry if it has ) but below is two VERY detailed video's of Tom installing dash cam's to both the front & rear of his MG4.
Part 1.
Part 2.
You can use a 2 blade fuse tap in the spare 3 blade socket to the right of the two that are already populated for switched live, as in the image earlier in the thread, as well as belowI can’t find a 3 blade fuse tap anywhere at the moment, is there a 2 blade fuse spot that can be used for powering a dash cam when the car starts, doesn’t need to stay powered when the car is off.
 . That's what I used on my install the weekend for switched live.
Plenty on E BayI can’t find a 3 blade fuse tap anywhere at the moment, is there a 2 blade fuse spot that can be used for powering a dash cam when the car starts, doesn’t need to stay powered when the car is off.
Mini Blade fuses, micro are lower profile.Is the fuse size mini or micro?
The cameras on the car are not of high enough definition for dash cam use. They are after all meant for parking.I find it hugely dissatisfying that the Trophy already has cameras in both directions, but to get a dashcam you have to add more. I'd happily pay for a module with some storage that'd stream dashcam footage from the 360 cameras, and it'd be much tidier.
(But being a bit tight, I have a clunky 5-year-old Nextbase camera suction-cupped to the windscreen)
I guess it depends what you want out of the dashcam. Recent footage from my 1080p cheap NextBase didn't allow us to discern the numberplate of a reckless driver. But it was easily enough detail to show we weren't to blame for a collision, on two occasions -- and so would the footage from the parking cameras.The cameras on the car are not of high enough definition for dash cam use. They are after all meant for parking.
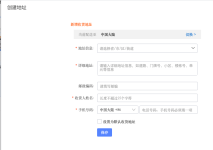
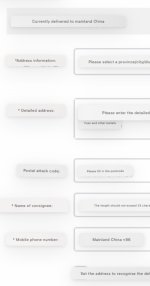
I can find it on Taobao but don't know how to complete the address panel in Japanese - can you help?It's here if you can access to Taobao.
https://m.tb.cn/h.UstiSun?tk=YqwEdPZ03U8
I have ordered 2, first one should arrive next week, second one should arrive end of May.
I will find out pin out and share here. I will also sale the second one if someone wants one.
Image translate on iPhone gives this…I can find it on Taobao but don't know how to complete the address panel in Japanese - can you help?
Can you not open it on the browser on your phone and have it translate the site as you use it?Thanks but I can't find a way to overtype the preset entries - all in Japanese