Information & Inspiration For MG Electric Vehicle Enthusiasts
You are using an out of date browser. It may not display this or other websites correctly.
You should upgrade or use an alternative browser.
You should upgrade or use an alternative browser.
💡MG5 REAR INTERIOR LIGHT 💡
- Thread starter Ian MG5
- Start date
-
- Tags
- mg5 rear interior light
CuriousIslander
Established Member
Where did you source this from? It looks good to me. Is it battery - operated or is it wired into the car?Hi all
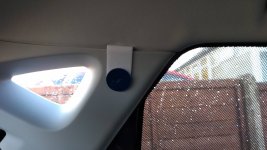
Just fitted a rear interior lightto my Mg5
Thought I’d just share a few photos
Cheers
View attachment 6108View attachment 6109View attachment 6110View attachment 6111
geobanc7
Standard Member
hi IanHi
Believe it or not it is from a jaguar
I sourced it years ago for my camper van conversion but never used it
It’s wired directly from the front interior lamp
how did you attach it ?
Ian MG5
Established Member
Hi
I totally agree it should have been there from factory, it was dark in the back but even darker when I had the windows limo tinted
I didn’t take any photos of install as I was trying to get it done before the rain came
Just put your fingers at the front of the interior light and pull it towards you in an arc (spring loaded at front clips at rear of light)
There are 2 black wires to each bulb I just snipped them and soldered them together then put them in terminal blocks just for a bit more security
At the light I was fitting I just measured central location marked the hole to cut
Then very carefully cut the hole with a sharp Stanley knife
Connected the wires to the light fitting with two insulated femal spade connectors
Then job done
Hope this helps
I will try n take photos when weather breaks again
Edoc16
Established Member
- Joined
- Dec 7, 2020
- Messages
- 383
- Reaction score
- 363
- Points
- 123
- Location
- Bannockburn Scotland
- Driving
- Not an MG
Well done Ian, could you nick up to Scotland and fit mine???Hi
I totally agree it should have been there from factory, it was dark in the back but even darker when I had the windows limo tinted
I didn’t take any photos of install as I was trying to get it done before the rain came
Just put your fingers at the front of the interior light and pull it towards you in an arc (spring loaded at front clips at rear of light)
There are 2 black wires to each bulb I just snipped them and soldered them together then put them in terminal blocks just for a bit more security
At the light I was fitting I just measured central location marked the hole to cut
Then very carefully cut the hole with a sharp Stanley knife
Connected the wires to the light fitting with two insulated femal spade connectors
Then job done
Hope this helps
I will try n take photos when weather breaks again

smoggie9
Standard Member
How did you feed the cable through to the rear light? (Sorry not very good at diy)Honestly if you know how to use a Screwdriver
Wire cutters
Pliers
Terminal blocks
Stanley knife
You can do it yourself
I’ll try and get some photos tomorrow
Alb
Moderator
- Joined
- May 11, 2021
- Messages
- 3,978
- Solutions
- 3
- Reaction score
- 5,327
- Points
- 1,622
- Location
- MG5 Mk1 SR
- Driving
- MG5
Excellent job Ian
Fluffykins
Established Member
- Joined
- Dec 23, 2020
- Messages
- 523
- Reaction score
- 595
- Points
- 205
- Location
- Norfolk (my lovely)
- Driving
- MG5
For feeding cable through a space like above the headlining, I have found that plastic parcel strapping is often very good to use as a leader.
Alb
Moderator
- Joined
- May 11, 2021
- Messages
- 3,978
- Solutions
- 3
- Reaction score
- 5,327
- Points
- 1,622
- Location
- MG5 Mk1 SR
- Driving
- MG5
If you do other wiring jobs from time to time it's worth investing in the right tools. I bought a set of CK rods some years back and they would be ideal for a task like this.
 www.screwfix.com
C.K Cable Rods | Electrical Tools | Screwfix
Buy C.K Cable Rods at Screwfix.com. Choose from top trade brands. Over 40,000 products. Free returns. 60 days free credit available.
Archev
Prominent Member
- Joined
- Mar 30, 2021
- Messages
- 1,288
- Reaction score
- 2,058
- Points
- 557
- Location
- Borowstouness
- Driving
- MG5
These are also invaluable for fitting the wire from front to back for installing front and back dash cams etc. Used just like mini drain rods ( but not nearly as smelly in operation I foundIf you do other wiring jobs from time to time it's worth investing in the right tools. I bought a set of CK rods some years back and they would be ideal for a task like this.
C.K Cable Rods | Electrical Tools | Screwfix
Buy C.K Cable Rods at Screwfix.com. Choose from top trade brands. Over 40,000 products. Free returns. 60 days free credit available.
 )
)smokie
Prominent Member
- Joined
- Sep 9, 2021
- Messages
- 1,477
- Reaction score
- 1,193
- Points
- 417
- Location
- Wokingham, UK
- Driving
- MG5
Sheesh I have a set of those in the garage, been therefor years, used maybe once.
Today I fitted the back bit of a dashcam and went all round the edge - didn't even think of going over the top!!
Still, it looks pretty good except the bundle of spare wire dangling in the boot... but if I went over thetop I suppose I could leave the spare wire in the lining?
Today I fitted the back bit of a dashcam and went all round the edge - didn't even think of going over the top!!
Still, it looks pretty good except the bundle of spare wire dangling in the boot... but if I went over thetop I suppose I could leave the spare wire in the lining?
Ian MG5
Established Member
HiHow did you feed the cable through to the rear light? (Sorry not very good at diy)
I just used a piece of plastic trunking lid but you can use a piece of stiff wire or a bit of thin garden cane
Tbo if you feed it from the new light position it slides down pretty easily
Alb
Moderator
- Joined
- May 11, 2021
- Messages
- 3,978
- Solutions
- 3
- Reaction score
- 5,327
- Points
- 1,622
- Location
- MG5 Mk1 SR
- Driving
- MG5
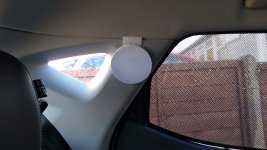
Here's the same image for my car

Ian MG5
Established Member
Have you got your finger over the lense
Just kidding mine was like that after the windows were tinted
Like many people have said the light should have been put in the rear at the factory
Sark21
Standard Member
Net curtain wire is good for feeding wire too 
Sark21
Standard Member
My solution rechargable lights hung on 3D printed hangers.Just hung from headlining.Ive since pushed them back a bit so no one catches them self .It has bonus of lighting up the boot too.
I did it this way as it's only a loan car
I did it this way as it's only a loan car
Attachments

Latest MG EVs video
MG3 Hybrid+ & Cyberster Configurator News + hot topics from the MG EVs forums
Published
