Installing a dashcam (with naked pics...)

And one final image from the drivers pov.

View attachment 39027
Looking good 5teep, well done. On my MG4 install, as I think I previously mentioned, I took the high route, ie the head lining by removing the rubber door seals near the roof area, it was a bit tricky towards the rear quarter, between the rear door and tailgate, but managed using a stiff draw wire and taped it to the feed cable as electricians do, for neatness it passed through the tailgate-to-car flexible rubber tube carrying the lighting cables, I had to disconnect the flexible rubber either end and used some silicone grease to help it pass through the (busy with cables) flexi tube, from there it was easy to mount the camera at the top and central on the tailgate window, finally passing the cable through one of the plastic grommets in the boot lid, your method and mine may help other DIY'ers take the leap of faith and save potentially a couple of hundred quid, or whatever a pro installation would cost, hopefully I'm able to take the same route, but may need to take the low route as you've done 5teep!
I was cautious of damage on my MG4, strictly it belonged to the finance company, but won't have the same worries as the new S5 is paid for already, so any balls ups are now down to me 😂👍.
 
Sounds like a good route. My S5 is still a bit new for me to feel comfortable pulling it apart but that's a better option than the way I did it. I'm happy with my job up until the boot section, having to leave a length of the cable loose so the lid can open annoys me.
 
fuse PXL_20250830_131155113_nometa.webp


I got it out but the fuse taps I have are two pin.
 
I'm not expert on car electrical systems, but as a logical thinker, they are all connected, maybe it's a fuse for 2 separate functions, if one goes the other stays live! 🤔
 
I'm not expert on car electrical systems, but as a logical thinker, they are all connected, maybe it's a fuse for 2 separate functions, if one goes the other stays live! 🤔
Correct. It's so two pieces of equipment can share a common power source.
 
As long as you can rotate the two holders by 180 degrees to each other, it's okay. I need one going up and one going down so I can fit both fuses next to each other.
 
Looking good 5teep, well done. On my MG4 install, as I think I previously mentioned, I took the high route, ie the head lining by removing the rubber door seals near the roof area, it was a bit tricky towards the rear quarter, between the rear door and tailgate, but managed using a stiff draw wire and taped it to the feed cable as electricians do, for neatness it passed through the tailgate-to-car flexible rubber tube carrying the lighting cables, I had to disconnect the flexible rubber either end and used some silicone grease to help it pass through the (busy with cables) flexi tube, from there it was easy to mount the camera at the top and central on the tailgate window, finally passing the cable through one of the plastic grommets in the boot lid, your method and mine may help other DIY'ers take the leap of faith and save potentially a couple of hundred quid, or whatever a pro installation would cost, hopefully I'm able to take the same route, but may need to take the low route as you've done 5teep!
I was cautious of damage on my MG4, strictly it belonged to the finance company, but won't have the same worries as the new S5 is paid for already, so any balls ups are now down to me 😂👍.
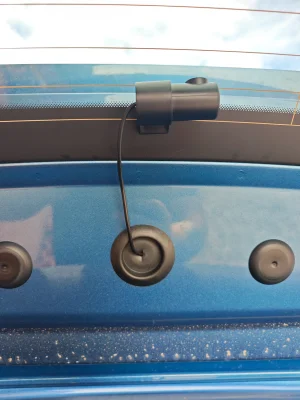
Bit the bullet tonight and using electricians rods I managed to get the rear cam cable fed along above the roof lining and then following your route through the rubber cable trunking to the centre plastic blanking plug. Looks a lot better now with just a short run of wire at either end visible and the camera is top dead centre too.
 
Bit the bullet tonight and using electricians rods I managed to get the rear cam cable fed along above the roof lining and then following your route through the rubber cable trunking to the centre plastic blanking plug. Looks a lot better now with just a short run of wire at either end visible and the camera is top dead centre too.
Good man, well done.
You've made my job a tad easier, we are on holiday in Portugal, I've spent an awful lot of time researching dash cams, and decided (I think) on Viofo A229 plus, as reasonably decent value for money and capable of doing everything I want, but don't want an internal camera watching me pick my nose and scratching my arse 😂🤣
 
Bit the bullet tonight and using electricians rods I managed to get the rear cam cable fed along above the roof lining and then following your route through the rubber cable trunking to the centre plastic blanking plug. Looks a lot better now with just a short run of wire at either end visible and the camera is top dead centre too.
Haven't fitted my rear camera yet but I might try this. Did you take any pics whilst you were doing the job?
 
After my middle lad's adventures installing Garmin dash cam, he had a pro auto-electrician fit it. The guy asked if he was sure he wanted it hooking up to a permanent feed. It killed the battery very quickly!

So.....I guess in an ICE vehicle, you need to be careful, either choose a system with a built-in back-up battery, or use a timer system that switches off after 15 mins or so after parking. But I suppose in an EV, the 12V will be topped up by the traction battery?

I had the same question. The manual implies that the car tops up the 12V battery regularly. I suppose it has to, because the telematics must be drawing some power all the time.
 
Following the thread, noticed your issue with the fuse tap so i had to search for a micro3 tap and i found it on aliexpress: Shhworldsea Micro3 Sicherung 3Pins Hochwertige PEC Automotive Auto Sicherungskasten 5A 7,5A 10A 15A - AliExpress 34

Gonna order some myself so im ready for my dashcam adventures. Now i just gotta make up my mind about which dashcam to get...
As previously mentioned somewhere on this forum, we are on holiday in Portugal, I've done lots of research out here and I'm still in favour of the Viofo 229 Plus (2 channel, just front and back) the low light vision is excellent for a 2k processor and £265.85 direct from VIOFO, it out shines my current Redtiger by some margin, it's a few quid less than their Amazon website is selling it, I guess it takes into account commission to Amazon, the next one up is another £100 smackers, I'm not sure anything dearer is dramatically superior, considering most people and hopefully that'll include us will never need to use it in a legal battle.
 
Haven't fitted my rear camera yet but I might try this. Did you take any pics whilst you were doing the job?
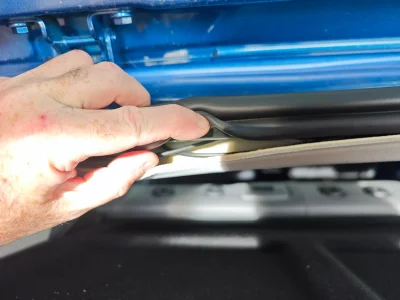
I used fibreglass rods to run along under the roof lining and grab the cable. Working from front to back seemed easiest If you take a line just about under the roof rail that's about right, too far over and you can't get past. Pull the lining at the back down to find the rod (took me about 20 mins working back and forth) once you have both ends, attach your cable and pull through. Needs to be pretty strong and stiff rods to stop it curling up, a plastic snake will not work.


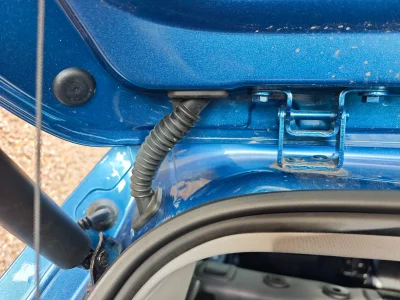
The next bit was both easier and harder than expected. Pull the rubber boot out at both ends, it's fair stuffed with wires so be careful. The car body seems to be a double skin there so be patient passing your cable through the bottom hole.
I used a long thin zip tie to help feed a string through the boot and the taped the plug to that. Greased the outer tape and it pulled through easily from the bottom up.
Next difficulty was passing a rod from the centre hole out through the cable entry, it's a tight corner but once done all you have to do is feed the wire along and out where you want it and tidy up. I tucked all the spare wire in under the roof liner.

IMG_20250902_161849.webpIMG_20250902_161836.webpIMG_20250902_161830.webp
 
Last edited:
Support us by becoming a Premium Member

Latest MG EVs video

First Look: MG IM5 & IM6 – Premium EV Saloon & SUV Unveiled at Goodwood!
Subscribe to our YouTube channel
Back
Top Bottom