• We are having a problem with new Hotmail members being unable to receive activation emails. Please avoid using a Hotmail email address. Thanks.

MG ZS EV Dashcam Hardwire.

Attachments

  • 317708781_3496681780617479_5740849421500037668_n.jpg
    317708781_3496681780617479_5740849421500037668_n.jpg
    193.5 KB · Views: 105
Last edited:
Tested the fuses and are you getting 12v out?

Sorry don't know much about hardwire cams but the video seems useful.
I havn't got a multimeter tester so can't test it. should be getting 12v as it's ment to be the front power socket. My fuse box has different value fuses. Asked my dealer and they don't install dashcams. Halfords wont touch EV
 
Last edited:
I havn't got a multimeter tester so can't test it. should be getting 12v as it's ment to be the front power socket. My fuse box has different value fuses. Asked my dealer and they don't install dashcams. Halfords wont touch EV
Daft question, have you tested the 12v socket? Just in case the contact has been pushed out of the socket.
 
I havn't got a multimeter tester so can't test it. should be getting 12v as it's ment to be the front power socket. My fuse box has different value fuses. Asked my dealer and they don't install dashcams. Halfords wont touch EV
Dumb that halfords wont touch EV as its the same power & control system right until you get into the engine bay.
However you can also shine a light through the fuse to see if it has blown.

BTW, is this cable your using lead up to a USB socket or is it direct 12v into the dashcam adapter.
I only ask as I use a generic 12v to USB dropper which gave me 2 5v sockets.
 
I'm using the nextbase hardwire kit straight into the camera
If I remember correctly, the nextbase kit has a mini USB for the charge port?
Daft question, but have you tried plugging the camera in with another cable to make sure the camera is good. Just to make sure your charger is working or not.
 
take the sd card out of the cam, the amount of units I've seen over the years that won't boot due to a corrupt sd card is quite shocking..
 
I've just had another think about this and I reckon the power to the camera will be going through both fuses overloading the original fuse if it's the wrong way round.
View attachment 2470
Thanks Kithmo - I was just about to fit my d-cam and thought I'd check for any useful advice - and there you were with this. My latest ev hasnt any Easily accessible 'spare' slot on the Passenger side Fuse Board, unlike my last ZS ev. So I was about to resort to using the Piggy Back. Fortunately I saw your advice and saved myself a potential Overload arrangement !

Adding a dashcam using hardwire kit, this can be a little unsuring to those without some auto electric knowledge, so if in doubt seek someone to do it for you.

The fuse box required is underneath the glove box, it is not covered so make sure there is no power switched on.
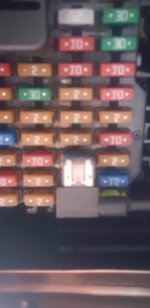
Fuse 15 is a 15 amp for power socket and your find it third row down on first row near back of glove box area.

The fuses are micro one so the piggy back is used with a 2 amp in the first socket and the 15 amp in second socket.

Feed the cable from centre of windscreen position and gently follow down and around pillar, do not use any force or tools into this area as there are airbags, your need to gently pull off the door rubber and use the channel to take wire down the door.

Side panel comes off with a movement using plastic car removing tools take it off and feed wire into the fuse box.

Connect to the grounding point near to fuse box and connect up to power to finish.

Place all rubber trim back as you found it.

The dash cam is now fitted and only comes on with power socket is working.
nextbase if set will run on for 5 mins from internal battery.View attachment 8View attachment 9View attachment 10View attachment 11View attachment 12View attachment 14View attachment 13
Excellent posting ! Its exactly how I did it, though in my '23 plate there were no empty fuse holder, so I have used the 'piggy-back' cable and the feed to the door.
 
Hi Team, my ZS EV Gen 2 has the same fuse box layout to toadinapintglass. It's an Oct '22 build. Here's a better picture (not reversed):

Fuse Box Oct 22.JPG


The 15A fuse for the 12V power socket appears to still be position 15 however the ratings of the fuses in positions 17-21 has dramatically changed, including the always-on window motors 4 x 30A fuses and the vacant slot now at position 19.

Here's the previously posted older(?) layout for comparison.
Fuse box original.JPG


As stated elsewhere, access is a real dog so before I start pulling each one out to try and determine if it's the same use or has a different purpose can anyone shed any light on this or suggest an alternative "always on" positon?

For context, I'm adding a dashcam and will be using fuse taps for ACC and Always-On.

Thanks.
 
The window 30A fuses have moved to CF43 & CF44 on the MY22 model. These are in the middle below the big relay CR6.

Each 30A fuse now powers both front and rear on one side of the car.
 
All good, Empty fuse socket 19 shown above in my post of 24th May is permanent live (always on) so tapped that along with socket 15 for the ACCessory tap. Thanks Team.
 
Last edited:
Support us by becoming a Premium Member

Latest MG EVs video

New EVs from MG: MG S9 & MG9 plus hot topics from the forums
Subscribe to our YouTube channel
Back
Top Bottom