Reverse Camera SE LR

Yea, I had to replace the full cable from the glovebox to the camera.

I replaced the existing camera with the new one, ran the new cable from the glovebox to the camera, and cut the orange wire on the camera to make CVBS mode as I ordered the 1080P version. The hole required for the new camera is bigger than the previous one, so I had make the whole bigger.

One thing I did differently from you is that I never removed the spoiler. I just thread the camera wire from outside hole through the existing hole on the inside where reverse wire come through. - the wire you are pointing at here

The new cable is very similar to the old one. On the glovebox side, its the same yellow RCA connector that goes into the video plug with a power wire forking out which goes in the same pink power wire. On the camera side, its the 4 pin small connecter

I want to mount the camera without removing the spoiler - sounds like the cable can be threaded but how did you tighten up the nut on the back of the camera? I was wondering if I could reach inside by removing the number plate light but I can’t see how that’s done, either?
 
I want to mount the camera without removing the spoiler - sounds like the cable can be threaded but how did you tighten up the nut on the back of the camera? I was wondering if I could reach inside by removing the number plate light but I can’t see how that’s done, either?
I didn't use the bolt. Instead, when drilling the hole, i made it slightly smaller so that the thread of the camera would "screw" into the hole. It's tightly screwed in and so I didn't feel the need for a bolt
 
I was wondering about the bolt too and in the end decided to remove the spoiler. Right close to where the camera comes through there is a sort of oval hole (15mm approx) in the metal which is covered by a 50mm rubber patch on the other side. You could break the patch for better access but still don't think you could usefully tighten the nut to any degree.

Also in that area you may find the wiring looms are different to the video. Mine has an equal number of wires in each of the body to boot lid corrugated hoses.

I think there is a 99% chance of me damaging the other cables trying to get the phono connector through them, which would be really bad as I think some of them are aerial leads 😲.

After looking at other options I decided I had to cut the phono off. I'll find out if the video is degraded when I solder them back together on another day. On the plus side I used the left hose and didn't have to route under the seats.

If I had a sleeve expander of a large enough diameter and length, that may have done the job. Looking on line it would cost about £55. The searches also brought up animal castration rubbers pliers for about £15 which had good diameter and 4 prongs, but small length. Also they didn't look quite man enough 🤨.

Regarding the troublesome white connectors on the spoiler removal: There is a latch on the right of the side facing you and another on the left of the side facing away. You can just use a screwdriver to release the front ones and tilt the spoiler a little to get the latch in to the hole.

For the rear latch on the RHS of the car it is angled a bit towards you and a screwdriver can be used with a bit of patience. For the left clip, rear latch you would need something like a screwdriver with a 5 to 10 mm bit at right angles on the end, perhaps cut out from a bit of metal or perspex? I took the easy way out and bought the suggested tool 🙂. (Still a bit fiddly but was always going to work).
 
Last edited:
I didn't use the bolt. Instead, when drilling the hole, i made it slightly smaller so that the thread of the camera would "screw" into the hole. It's tightly screwed in and so I didn't feel the need for a bolt
This seems to have worked ok for me, too, although my hole was too close to the boot lid so I couldn't rotate the camera to screw it in, but with some flexing the thread has gone in and I don't think it will come out. it also doesn't sit totally flush with the black section but at a bit of an angle, this means my rear view is actually better (less rear bumper on view). The plug I was able to get hold of by slitting open the black oval of plastic on the inside of the boot lid. Still need to fish the cable through the rubber joining boot lid to frame (I have some stiff wire I am hoping i can feed through first and then pull the camera cable through with.

Not sure if it's co-incidence but my DAB reception is terrible now - wonder if the camera signal cable is interfering with the aerial cable in some way?
Not had a problem with DAB, camera cable running through drivers side corrugated boot.
 
DAB and FM both still good here. Cable running through passenger side corrugated boot. Note @DevonMG4 and my harnesses are quite different in the boot lid though.

On going in to reverse, the radio softens to almost inaudible which i assume is a very useful feature and not what you've observed?

From memory there were several aerial type looking connectors on both sides which might be worth checking.
 
Last edited by a moderator:
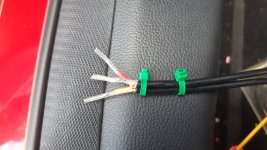
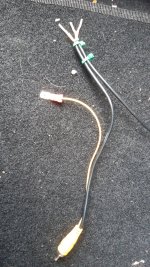
So as promised, updating the thread here showing the wireless reverse camera affixed to a registration plate frame. I attached the frame to the factory fitted bolt holes instead of the cowboy drilled into the bodywork holes that the dealer did (a story for and from another thread!), this allows enough clearance to mount the camera at the top of the registration frame and give enough clearance to still access the boot release catch.

I used the standard euroclip registration plate frame with 3M VHB tape affixed to the reverse camera mount behind it. Note that you cannot fully open the hinge of the reg plate frame with that installed, but you can sufficiently open it enough to insert the reg plate and pull down the sprung holders.


View attachment 17476
View attachment 17477View attachment 17478

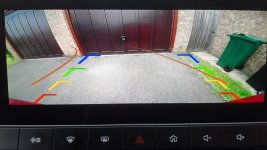
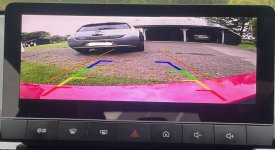
Simple install and very pleased with outcome. Works out more cost effective to buy a pack of two reg frames...image of the front frame.....

View attachment 17479

And yes, there are a couple of spots on the paving to weed :-D
Could you link us to the frame, or similar product? Thanks
 
Thought i'd add some pics of how it actually looks now when reversing. As you can see the lens distorts the image quite a bit and the lines are in the wrong place - compare with the third pic of what you see in the mirror. I think it doesn't help that the video image is stretched to a ultra wide screen format, if it was in 4:3 with the lines in the same place they might be about right!
tempImageHMLA48.jpg
tempImageuRts7s.jpg
tempImagehOJe6N.jpg
 
Support us by becoming a Premium Member

Latest MG EVs video

MG3 Hybrid+ & Cyberster Configurator News + hot topics from the MG EVs forums
Subscribe to our YouTube channel
Back
Top Bottom