nerfmg
Standard Member
- Joined
- Jan 8, 2023
- Messages
- 36
- Reaction score
- 38
- Points
- 11
- Location (town/city + country)
- Preston
- Driving
- MG4 (2022-2025)
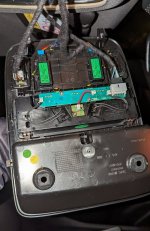
Eek. I've got a problem. When pushing the new LED into the socket it fell through the plastic molding. I've tried for 15 minutes poking it back into place but the clips on the side are preventing it getting back to its original Position.
I think I need to remove the plastic panel which holds the glasses holder, lights and speaker.
Anybody got any ideas what I should do?

I think I need to remove the plastic panel which holds the glasses holder, lights and speaker.
Anybody got any ideas what I should do?

 . See the picture 2 posts below to see where the metal clips are that are the thing to be most careful of when removing.