Google Translation…
electric car forum
Electric car forum on GoingElectric.de
Elektroauto Forum - GoingElectric.de
Build Vehicle to Load Adapter yourself, DIY V2L
Vehicle to Load Adapter selber bauen, DIY V2L - ZS EV - Laden, Ladeequipment • MG ZS EV - Elektroauto Forum
Page 1 of 4
Build Vehicle to Load Adapter yourself, DIY V2L
Posted: Sun Feb 27th 2022 12:57pm
by DIY V2L
Hello to everyone who would like to build the V2L adapter cheaply themselves.
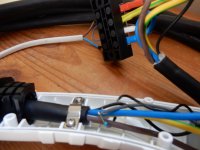
I recreated the V2L adapter for the MG ZS EV FL. 300 Öcken are too much for me. A type 2 plug (female) is required, a 1ph is sufficient here, 3ph are not output. I bought a 3ph plug on Ali, which was there in about 2 weeks for just under 40 euros. The following interconnection must be made in the connector:
L, N and PE of course to a line with Schuko socket, Cee, or whatever. I took a 3G2.5 rubber cable with a Schuko coupling. The CP pin must be connected to PE. The PP pin must also be connected to PE via a resistor. The resistance must be greater than 440 ohms. Smaller resistance values are not possible, with 440 ohms it works perfectly. The value gives a voltage drop of 1.58V across the resistor. I tried to relate this voltage value to the IEC 61851. Since I don't know the exact wiring inside the MG on the CP pin, I can't give any more precise information. Obviously the CP has to be grounded, but the PP has to reach a certain voltage level. The interconnection takes place in the connector. This gives you a clean adapter with a cable length of your choice. The whole thing with cable and Schuko socket costs less than 50 euros.
Of course, I do not take any responsibility for damage to the car in the case of a replica! The adapter works perfectly.
Build Vehicle to Load Adapter yourself, DIY V2L
Posted: Mon Feb 28, 2022 10:46 pm
by Klaus
Hi there,
thanks for the information. How did you come up with that?
Do you have a picture of the connector?
Re: Build Vehicle to Load Adapter yourself, DIY V2L
Posted: Tue Mar 1st 2022 5:28pm
by DIY V2L
I have long searched the net for anyone who has such an adapter and sometimes unscrews it. In the forum for the Ioniq 5 forum I found the following threat:
viewtopic.php?f=531&t=64282&start=190
In addition, I have included the following essay:
https://www.researchgate.net/publicatio... _Standards
Here the basic function is explained, e.g. for AC charging and the communication that takes place. The IEC 61851 doesn't leave much leeway for a manufacturer's special quirks, as he clicks on the car that a factory discharge adapter is plugged in. So it was not surprising that the Ioniq adapter is quite simple. The same wiring didn't work with the MG, but from the basic idea of the Ioniq there were only a few variants until I found the working circuit here. The connector came with 2 pieces of 220 ohm resistors. One didn't work, both in a row did. Then left it at that. According to IEC, either 5V is drawn over 330 ohms to PP, or over 330 ohms to PP and then over 4.7 k ohms to PE/ground in the vehicle. The two values would result in a different voltage drop at the connector between PP and PE at 440 ohms outside the vehicle. Since there are 5V at idle, there shouldn't be a 4.7k ohm resistor between 330 ohms and PE. I then gave up reverse engineering. The thing works, that's all I wanted.
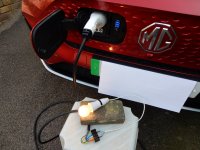
I only have a horrible picture when I connected some kind of lamp to experiment to see if it really works. The two signal contacts and the PE are still hanging out of the type 2 plug, so that I could switch different switching variants outside. Even the Schuko adapter is still some kind of basement find. Finally, I made the connection in the connector.
Here is the link to Ali....
404 page ... 180
Build Vehicle to Load Adapter yourself, DIY V2L
Posted: Tue Mar 1st 2022 5:48pm
by Klaus
Hi there,
you should also be able to use / convert these adapters here, provided that the type 2 plug is screwed on.
https://www.amazon.de/EV-Adapter-Electronic ... 6153199370
Great guide
Re: Build Vehicle to Load Adapter yourself, DIY V2L
Posted: Tue Mar 1st 2022 4:16pm
by DIY V2L
Hello Klaus,
Unfortunately, you cannot use the cable because the type 2 plug is "male", i.e. with pins. This is intended for plugging into a charging station, so that you can charge an e-bike battery or similar at a public charging station. A certain simulation circuit has to be installed there too, so that the charging station thinks there is an e-car attached....
On the vehicle side you always need a "female" plug, so actually you should say coupling. The "female" connector has sockets, not pins.
Attached is a cheap plug from a source in Germany. This is only one-pole, but as I said, that's enough, since the bidirectional charger in the car only outputs current on one phase....
Elektrofachmarkt-online - Elektrofachmarkt-online ... gJnTfD_BwE
Re: Build Vehicle to Load Adapter yourself, DIY V2L
Posted: Tue Mar 1st 2022 4:16pm
by TOMMIKNOCKER
Thank you for your report, your fingers are itching
")
In the Ioniq 5 thread, the Forent LTH put a switch between CP and PP, did you do the same with your version?
And according to the circuit diagram, the CP - PE connection also runs via the resistor, it sounded different with you. Or does it not matter?
Re: Build Vehicle to Load Adapter yourself, DIY V2L
Posted: Tue Mar 1st 2022 4:20pm
by DIY V2L
A switch is not necessary with the MG (thank God). You can also connect the CP to PE via a resistor. Here, too, I had the 220 ohm resistor in there when trying it out. Also worked. But I see no need for resistance.
The Ioniq seems to need the signal via the switch with a time delay to release it, so plug in first, then press the switch. Thanks to China, the MG doesn't care. Static interconnection, plugging in and you can already see in the discharge menu: Start discharging..... After activation, it feels like it takes a few seconds.... and the light goes on
Build Vehicle to Load Adapter yourself, DIY V2L
Posted: Tue Mar 1st 2022 6:30pm
by TOMMIKNOCKER
So almost like that?
Code: select all
Schuko coupling type 2 coupling
L o------------------------------o L1
No o------------------------------o N
PE o----o---o--------o PE
| | ___
| '---|___|-------------o PP
| 440 ohms
|
'------------------------o CP
Re: Build Vehicle to Load Adapter yourself, DIY V2L
Posted: Tue Mar 1st 2022 6:31pm
by DIY V2L
That's exactly how it's wired for me!
Re: Build Vehicle to Load Adapter yourself, DIY V2L
Posted: Tue Mar 1st 2022 6:35pm
by TOMMIKNOCKER
Perfect thank you!
All times are UTC+01:00
Page 1 of 4