Dashcam install

Hi,
My car is a luxury edition, but I don't think that the fuse box and the rooting of the wires must be so different from the XPower. Anyway, it this can help you, here how I did it in order to power the dashcam from the cabin fuse box:
Routing the wire between the windscreen and the roof trim is very easy, I just pushed it gently with a plastic tool, like the one in the picture bellow:
1706982659736.png

This really took me something like 15 minutes to route the wire.
I didn't even removed the plastic covering of the windshield left side pillar, but just lifted it to let the wire be pushed behind.
After that you arrive to the fuse box by routing the cable behind the rubber door seal, that you need to remove before.

access-fuse-box.jpg

Accessing the fuse box is done by popping up the plastic cover that stands between the door and the left side of the dashboard.
Then you need to remove 2 screws and unclip the front lower part of the dashboard (see picture here up).
Fuse box is behind there:
fuse-box-driver-seat-side.jpg


And these are the connections that I found/checked:

fuse-switched-12V-and-perm-12V.jpg

For the moment I do not use the permanent 12V, but will need it in the near future as I plan to install a dashcam battery (Cellink Neo 8+).
Connecting the rear dashcam was not very difficult nor invasive. I routed the wire on the side of the roof like this:

routing-to-back-dashcam.jpg


I hope this will help you, or at least give you some ideas :)
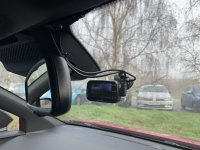
 
You appear to have not given any consideration to Side Airbag Curtain Deployment.

You need to route correctly behind the A pillar Curtain Airbag anchor point, then down to the side trim that runs along the inside of the car.

Running a cable as you have along the top will, at best, interfere with the correct deployment of the Airbag and at worst, make the cable a high speed projectile on deployment in an accident.

Screenshot_20240203_192848_Microsoft 365 (Office).jpg
 
Last edited:
Not sure I follow, do you have some pics? I installed mine a few weeks ago and basically followed this video. Are they doing it correctly?


At 7:30 he even shows you the airbag!!!!!!

You don't want anything between you and the airbag. The end.
The last time I checked NCAP were doing their crash tests without half assed, ill thought out dashcam installs.

Just because it's on YouTube does not make it right.

Yes, the airbag "might" deploy correctly but would you want to take the risk?

The manual says don't obstruct the airbag and any dashcam instructions I have ever read, tell you not to do the same.

The risks of running the cable where he has are,
A, It not deploying correctly in an accident?
B, Whipping you in the side of your face at 200mph!


From Tin'ternet....
At what speed do airbags go off UK?
Do airbags deploy at 200 mph?
As mentioned above, air bags explode at speeds of 200 MPH for 12 to 18 inches. This is a violent reaction, necessary to have the bag deployed and beginning to slowly deflate when the occupant contacts the bag.
 
It's at the top of the A pillar.
Pull down door rubber from top to bottom.
Prise off A pillar.
Make sure cable goes behind airbag anchor point.
You will see a natural channel where the door rubber sits.
Route behind the trim all the way along the bottom of the car to the rear.

My cable comes out where he starts the video.
Then under the rear head lining to the point you want your camera.

I did mine months ago now, and didn't take pictures as the MG4 had been out quite a while and assumed someone would have already done a 'how to'.
 
Hi,
My car is a luxury edition, but I don't think that the fuse box and the rooting of the wires must be so different from the XPower. Anyway, it this can help you, here how I did it in order to power the dashcam from the cabin fuse box:
Routing the wire between the windscreen and the roof trim is very easy, I just pushed it gently with a plastic tool, like the one in the picture bellow:
View attachment 23585
This really took me something like 15 minutes to route the wire.
I didn't even removed the plastic covering of the windshield left side pillar, but just lifted it to let the wire be pushed behind.
After that you arrive to the fuse box by routing the cable behind the rubber door seal, that you need to remove before.

View attachment 23587
Accessing the fuse box is done by popping up the plastic cover that stands between the door and the left side of the dashboard.
Then you need to remove 2 screws and unclip the front lower part of the dashboard (see picture here up).
Fuse box is behind there:
View attachment 23588

And these are the connections that I found/checked:

View attachment 23589
For the moment I do not use the permanent 12V, but will need it in the near future as I plan to install a dashcam battery (Cellink Neo 8+).
Connecting the rear dashcam was not very difficult nor invasive. I routed the wire on the side of the roof like this:

View attachment 23590

I hope this will help you, or at least give you some ideas :)
Thank you for this, it's very helpful!
I presume that subsequent comments about airbag issues are only relevant when installing a rear camera? I have no plans for this as the Nextbase has an optional rear-facing camera that can attach to the main unit simply looking over the seats through the rear window.
Hi,
The way that I routed the dashcam wires didn't reached any airbag sensitive area.
It was passed just behind superficial plastic trim. I have seen installation instructions where people were removing that plastic trim all around, etc, but this is absolutely not necessary. Only a little lift and push the wire behind them.
If you do not have to install a rear camera, then it is really easy and fast, doing it the way I did it.
 
Just wondering if anyone has installed a blackvue battery b-130x or something similar to allow continuous recording in parking mode.

My BlackVue 900X has a built in low voltage and auto shuts off.

Under what condition does the main drivetrain battery top up the 12v battery

Apologies but I’m struggling to get the rear view mirror housing off, I want to improve the cable routing but I’m worried I’m going to break it.

Any tips ?

Thanks

Thanks to @Crawfyp’s advice I was able to get the right cover out with a little bit more effort. I don’t see any wires in there but I got some images for future reference.
@nate2d or anyone that has taken the mirror cover off, how much force did you use as I'm struggling.

Also any pointers for getting it back on.

Thank you
 
Help please, I’m struggling to get the rear view mirror housing off, I want to improve the cable routing but I’m worried I’m going to break it.

Any tips greatly received as I want to try and do this at the weekend.

Thank you
 
Just fitted a Road Angel Halo Go, following the excellent advice and instructions on here. At the moment, Halfords have this camera, SD card, and full hardwire kit for £99.99, but there is a code for 10% discount (MOTORING10)
The mini fuse piggy back connectors are perfect for direct plug in to the fuse box, using the positions shown by TechNick (iirc)
 
I still can't get the right hand side of the interior mirror surround off, maybe they have been glued as well on phase 2 cars so going to have to live with the cable being on show.

Bit of a shame but not the end of the world.

My 2ch Blackvue 900X works well though and gets a good field of view from both the front and rear camera.
 
I just did the hard wire to the interior light and also upgraded the interior light to led.

Rear camera routed via door seals and behind the pillar panels and up into hatch and the out from the central bung between the twin spoilers. Took about 30 mins all in, very easy.
I just hardwired in main 12v for the interior lights using 2 splice connectors and the wrapped the 12-5v converter in a bit of foam to prevent rattles .
 

Attachments

  • IMG_1737.jpeg
    IMG_1737.jpeg
    336.9 KB · Views: 35
I just did the hard wire to the interior light and also upgraded the interior light to led.

Rear camera routed via door seals and behind the pillar panels and up into hatch and the out from the central bung between the twin spoilers. Took about 30 mins all in, very easy.
I just hardwired in main 12v for the interior lights using 2 splice connectors and the wrapped the 12-5v converter in a bit of foam to prevent rattles .

Is it easier going through the interior lights rather than the fuse board for power ?
 
Some new item on Aliexpress: replacement center mirror cover, with integrated DVR. Has anyone tried it?

Sa95ac331d7ce4b46ae4f91b9f17db8c1V.jpg


e.g. something like this:
60.9ï¿¡ |4k Hd 2160p New Plug And Play Wifi Car Dvr Video Recorder Dual Lens Dash Cam For Mg Mg4 Mg Mulan 2022 2023 With App Control - Dvr/dash Camera - AliExpress

The only drawback I see is the lack of built-in screen. All the control and monitoring done through smartphone app...

PS: one more drawback: you can not turn the camera to the driver's side, to shoot the police officer.
OH! 🤪
Shoot... am... not in THAT sense!

Or,.... sometimes... :eek:
 
Some new item on Aliexpress: replacement center mirror cover, with integrated DVR. Has anyone tried it?

The only drawback I see is the lack of built-in screen. All the control and monitoring done through smartphone app...

There's also the bigger drawback that no one makes a version of that for right hand drive cars.
 
Is it easier going through the interior lights rather than the fuse board for power ?
For me it was, the main thing is not having to pull the cable up from the fusebox up the the pillars to the camera location.

The light unit is real easy, just undo the 2 screws hiding inside the glasses popdown box, then easy to prise the unit out, I did not need a spudger.
 
Support us by becoming a Premium Member

Latest MG EVs video

New EVs from MG: MG S9 & MG9 plus hot topics from the forums
Subscribe to our YouTube channel
Back
Top Bottom