Has anyone on here hardwired in a dashcam to the MG5 yet?

 
I had one fitted by Halfords at the weekend.
At first he thought all fuses were live but he did find one that was ok.
I'm afraid that's the extent of my knowledge as installation took a couple of hours and on a cold day I left him to it.
My mileage is a lot less than it used to be so I opted for the cheap and cheerful Halfords top of the range own brand.
Due to a curious pricing policy it's cheaper to have front and rear cameras rather than front only - at £109 fitted they were £30 or so cheaper than having just the front.
One problem with the rear camera is it tends to affect the radio reception particularly Digital. I was aware of this and may just remove the rear camera connection so it's just a visual deterrent -it's still worked out cheaper!
Halfords tend to have mixed reviews for installation but Havant branch have hard wired 3 cars for me and I've always been impressed.
Booked in at Halfords mobile last week only to be told on their arrival that they won't do electric cars and they refunded me.
 
Not the first time that has come up.
They seem to think they may encounter dangerous voltages whilst doing this.
 
Did they give any explanation?
I had no issues when mine was installed.
If there is a problem it's just as well the new models have a dedicated input for a dash camera
 
I looked at this the other day and came to the conclusion there must be better access to the fuse box. I posted the question on here because the handbook refers to removing the trim below the steering wheel.

The only screws I could find are under the dash end panel to lock in two clips. Snap fit trim is not that unusual in the motor industry but I wanted to be sure on a brand new car there was no other fixing before starting to get rough.

A contributor provided photos to confirm there was nothing else so:

1 Release door seal off of its web from below the dash end up to the top of the A pillar trim

2 Prise off the dash end panel using the little screwdriver slot (don't use a metal screwdriver as this marks the plastic). You can now see the fuse panel and some have used the nearest fuse F1 through here but it is bit of a pain.

3 Remove the two screws revealed locking the trim panel clips. Lift these clips and prise the trim slightly towards the back to stop them re-engaging.

4 Grip the trim in the gap to the right of the steering column and below the bonnet release. A short sharp pull horizontally backwards will disengage the retaining pins but only pull out by about 2-3 CM

5 This is because the trim continues under the column and up the left side and this needs its own pull in a similar manner. Once you have released both sides you can lower the trim panel down and it will hang on the bonnet release cable.

You now have full and unrestricted access to the fuse panel. It sounds a bit of a faff but it makes the job so much easier and in reality is quicker done than described.

Please remember when you run the cable up the A pillar the trim contains part of the curtain airbag so tape the cable to the metal A pillar itself so it cannot get in the way of the airbag deploying.
 
Did they give any explanation?
I had no issues when mine was installed.
If there is a problem it's just as well the new models have a dedicated input for a dash camera
Just said they do not install on electric vehicles due to the different voltages on the car.
 
Just said they do not install on electric vehicles due to the different voltages on the car.
I had the same response from Halfords when I wanted one in my ZS EV.

They said that they (Halfords in general) had had incidents which caused expensive repairs to be needed. I followed this up with a visit to my dealer who stated they had had to fix badly installed dashcams, which being a dealer was of course not cheap.
 
The fuse box would have to have a cover with high voltage warning labels if anything to do with traction battery levels existed in the space so the claim about voltages is nonsense.

It is more likely not giving due consideration about which fuses to use, The MG5 has a dedicated fuse for the switched feed to the accessory socket which is the obvious choice as there are no clever electronics involved.

Previously I have used the interior lamp fuse for the unswitched feed but from the labelling this does not have a dedicated fuse in the MG5. One of the reasons why I wanted a better access to the fuse box is to assess which one might be best properly. The fuse box as a whole has a high power 12v connector on it from the engine bay 100A fuse, it's a case of finding a fuse with one terminal directly connected to that.

ADD-A-Fuse modules have made the job so much easier since I used to do this as a fitter.
 
I think it's pot luck which Halfords you go to and the ability of the local fitter. I had my Nextbase one fitted at my local Halfords!
 
Dash cam now fitted.

Console USB and power socket for the switched feed.

Drivers Electric Seat for the unswitched feed.
 
Fuse F1, I use "add-a-fuse" adaptors.

I stress removing the trim panel makes the job much easier.

Most of the fuses on the left row appear to be continuous live but it is unlikely the seat power is going to be monitored by the ECU in any way. The seat fuse is 25A middle row with two empty spaces above which gives clearance for the adaptor.
 
I bought a kit from Amazon to hard wire the camera. I am not experienced at this but managed to follow the instructions from @Hairyfool to expose the fuse box.

For me it is a little fiddly and I am nervous of breaking anything, but I couldn't get the add-a-fuse bit to plug into the fuse socket. Maybe I wasn't being man enough, but looking at it (and below is a similar one) the raised bit of plastic on the side between the pins makes it too fat to slot in.

Do I just need to be a bit rougher, or is there a different part I should get?
 

Attachments

  • Screenshot 2022-06-29 162812.jpg
    Screenshot 2022-06-29 162812.jpg
    9.1 KB · Views: 129
There are several types and sizes of these blade type fuses so a search on line for blade type fuses will show the difference
 
They come in three sizes.
If you buy a proper kit from the likes of Nextbase, you get all three.
 
I got a kit supposedly for the IIWEY camera I have. It has the three different size USB connectors for the camera end and the three different size fuse add-ons for the fuse end.

So although it has the right size, as in the pic, that has a fat profile which prevents it going fully home (the bit I've circled).
 
This is a useful guide to the fuse types:


My MG5 LR took mini type fuses. I’d guess all models are the same. I used these adapters for mine, and they fit without trouble:


Note that they don’t come with any fuse to protect the piggybacking circuit, so you’ll have to grab them separately if your camera kit doesn’t come with the right mini fuses.
 
I bought a kit from Amazon to hard wire the camera. I am not experienced at this but managed to follow the instructions from @Hairyfool to expose the fuse box.

For me it is a little fiddly and I am nervous of breaking anything, but I couldn't get the add-a-fuse bit to plug into the fuse socket. Maybe I wasn't being man enough, but looking at it (and below is a similar one) the raised bit of plastic on the side between the pins makes it too fat to slot in.

Do I just need to be a bit rougher, or is there a different part I should get?
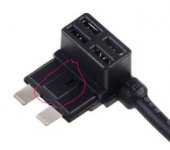
If it helps I found that the fuse housing was extremely tight anyway, even for the fuse I was removing, which I think from memory was F1 for the 12v socket.

Putting the piggyback in required a fair amount of effort to push it all the way home, but it was definitely the right connector as shown above 👍🏻
 
Support us by becoming a Premium Member

Latest MG EVs video

New EVs from MG: MG S9 & MG9 plus hot topics from the forums
Subscribe to our YouTube channel
Back
Top Bottom